
Lesson
Lesson
6
of
of
17
Car Control 101 Part 2

Lesson by
Connor Bell
Lesson by
Connor Bell
Mark as Finished
This workshop introduces a foundational approach to car control that will help both newcomers and veterans refine their ability to find the limit in a very particular way with specific cues. The techniques covered here will serve as the foundation for future workshops throughout the season.
Learning Objectives
For newcomers to the Academy (two months or less):
Understand that the limit is not a scary term
Learn how to find the limit in two out of the four sections of a corner
Apply these learnings to the real track after practicing on the centripetal circuit
For Academy veterans:
Review foundational concepts
Increase the depth of your limit cues
The first two exercises will take place on the centripetal circuit. League participants should use the spec racer Ford (SRF), while non-league participants are free to run any car on the centripetal circuit.
Understanding the Limit
The word "the limit" will be referenced frequently throughout this workshop. It's important to clarify what this term does and does not mean.
What the Limit Is NOT
The limit does not mean spinning, crashing, locking up, or going off track. When drivers spin and hit the wall, they often say they "found the limit," but this is actually a prime example of exceeding the limit—going over the available grip of the tires.
Defining the Limit
The basic definition of the limit is the maximum load the tires can withstand. There are three states in relation to the limit:
Over the limit: Exceeding the available grip of the tires
Under the limit: Not using the tires to their maximum capability
At the limit: The sweet spot in the middle where we maximize tire grip
We always want to be driving at the limit—this is always the goal in racing. We should be maximizing the grip that the tires are providing. Once we acquire the ability to drive the tires to the limit, we want to structure our corner with the goal of staying at the limit from entry to exit.
Limit Cues and Why We Need Them
We never want to brake with the goal of achieving a specific amount of braking pressure. This approach has several problems:
It doesn't account for track characteristics
It doesn't account for different conditions (weather, temperature, etc.)
Trying to mimic peak pressure from track guides or other drivers' telemetry doesn't account for compressions, crests, or temperature variations
It will sometimes put you over the limit and sometimes drastically under the limit
The main reason we want limit cues is because they are real-time indicators of grip levels. Limit cues automatically morph into what the limit is at that exact moment, which is why they're easier to replicate consistently.
Categories of Limit Cues
There are three different categories of limit cues:
Category 1: Audible sounds
Sounds from the car and tires
Particularly the sound being produced by the tires as you approach the limit
Category 2: Visual cues
In non-ABS cars (spec racer Ford, formula cars, some GT cars): physically seeing the wheel stop, seeing smoke, seeing lock-up lights (old Porsche Cup, some old GTE cars, LMP2)
In ABS cars (GT3, GT4): ABS lights that engage when the system activates (approximately 80% have these)
Horizon movement and what we're seeing visually
The speed at which we're approaching the corner—our rate of slowing as we track the apex while decelerating
Category 3: Tactile or general feel
Force feedback through the wheel
Base shakers (if equipped)
Pedal haptics (such as SimuCube active pedals or SimMagic pedal shakers, when set up correctly)
The Most Important Limit Cue: Tire Sound
Tire sound is considered the most important limit cue for several reasons:
Universal application: No matter what car we're in, we always get tire sound, even though it's not the same from car to car
Easy recalibration: We can easily retest and figure out what tire sound we're looking for
Real-time adjustment: It automatically adjusts to the grip level at that exact moment
Works in all four sections of a corner: Tire sound can be used under straight line braking, initial turn-in, mid-corner, and exit
In contrast, force feedback works best mid-corner and on corner exit, but is less useful for straight line braking and initial turn-in.
Audio Settings Configuration
For newcomers to the Academy, it's crucial to configure your iRacing audio settings properly. Navigate to your iRacing settings, go to the audio tab, and ensure your settings look similar to these recommendations:
Tires: Maxed out
In-car: Maxed out
Engine slider: Pulled down to amplify tire noise even more
The bare minimum for the engine slider should be -12 decibels. A recommended range is around -15 decibels. Some experienced drivers run theirs at the lowest setting, which is -20 decibels. You can experiment within this range to find your sweet spot. If your engine becomes too quiet after these adjustments, feel free to crank up your master volume—this will also help you hear the tires even better.
Step One: Finding the Limit Under Straight Line Braking
Finding the limit in any given situation can be a difficult task initially. We're going to make this as easy as possible by starting with the safest and most controlled scenario.
Why Start With Straight Line Braking?
Testing tire grip under straight line braking offers several advantages:
Safety: It's the safest point in the corner to get to the limit. The worst thing that happens is a slight lock-up, causing you to go slightly under the limit. In contrast, trying mid-corner techniques without the necessary skills can result in spins or understeer, leading to frustration.
Easy identification: It's the easiest point in the corner to identify when you've gone over the limit—you simply lock up. This is very easy to hear and see.
Controlled environment: It allows us to get comfortable with our cues in a controlled environment with no variables like steering wheel input or excessive downshifting. We can focus entirely on what we're targeting.
Important: Turning Off Force Feedback
For the first few exercises in this workshop, we are going to turn off force feedback. The reason for this approach is that we want you to get a good feel for the other available limit cues, with the most important one being tire sound. We're also going to practice visual cues.
For Academy veterans who feel they already have a good feel for tire sound, this exercise will push you even further because you won't have that extra sense of force feedback to rely on.
To turn off force feedback, access the black box in iRacing (F8 or F9) and pull the slider down to zero.
Exercise One: Straight Line Braking on Centripetal Circuit (10 minutes)
This exercise takes place on the centripetal circuit with the SRF (for league participants) or your car of choice (for non-league participants).
Exercise Instructions
Begin against the outer wall and pick up speed headed towards the middle of the circle
Keep the wheel straight (this is highlighted for emphasis—especially important since we have no force feedback)
Begin by braking at 100% (you will lock up on purpose—in order to find the limit, we must first go over it)
Dial down braking pressure after each attempt in small increments: 95%, 90%, 85%, 80%, etc., until you get right below a lock-up (these increments don't have to be perfect; just go down by small amounts)
Once you reach the point right below a lock-up, connect that braking pressure to a very specific pitch that the tires are producing
Replicate this target tire sound five attempts in a row, starting at the outside wall and going to the middle with speed, braking to the limit each time
To confirm you are exactly at the limit after five successful attempts, increase your brake pressure by a couple percent—you should theoretically go over the limit with just that small increase
If you don't easily go over the limit with that couple percent extra, go back through all five steps again
Recommendations
For new Academy members, it's highly recommended to do this without any downshifting. Upshift to pick up speed, but leave it in that gear as you're testing the limit under straight line braking.
For Academy veterans, you can go straight into downshifting, but it's still recommended to start without downshifting and then work your way into it.
Step Two: Testing Grip from Maximum Rotation Point to Corner Exit
Now that we have straight line braking established, we're going to move on to the next easiest portion of the corner to test grip: from the maximum rotation point (MRP) through to corner exit.
On the centripetal circuit, we don't actually have a traditional maximum rotation point—we're mimicking that scenario in a controlled environment. On a real track, this section would be anything beyond the apex.
Limit Cues for This Exercise
For this exercise, we will be using tire sounds and visual cues to identify and drive the limit of the tires. Force feedback should still be set to zero.
Exercise Two: MRP to Exit on Centripetal Circuit (8 minutes)
Exercise Instructions
Keep force feedback set to zero (as it should have been from step one)
Pick one of the circles on the centripetal circuit (they are marked—there's a 50, 60, 70, 80, etc. circle with markers at the start/finish line before each one)
Any circle should work fine for this exercise
Find the circle and bring the tires up to the limit while maintaining that limit based on tire sound and visual cues alone
Identifying Over the Limit
When you go over the limit in this exercise:
The tire sound will become too high of a pitch (high-pitched squealing)
You will begin to understeer
Visually, the horizon in front of you will slow in the way it's accelerating across your screen
If you try to add more steering input to find more grip from the front tires, it won't work
Identifying Under the Limit
When you are under the limit:
You won't be getting enough tire sound based on experience
The horizon will not be rotating as fast as it could if you were at the limit
Finding the Target
Use what you learned from the straight line braking exercise to give you an idea of the rough tire sound you're looking for. The tire sound should be fairly similar from straight line braking to this exercise. Once you identify over the limit, dial down to the limit and connect that to the tire sound. The goal is to increase speed until you reach the precise tire sound that indicates you're at the limit, then maintain that sound consistently.
What we're working on here is figuring out and getting a better understanding of what tire sound we're looking for. It's very easy as a driver to target a general range of tire sound, which is a good starting point. But in this workshop, we're looking to be a little bit more specific—we want to dial in exactly what pitch we're looking for.
Exercise Three: Applying Learning to the Real Track - Part 1 (10 minutes)
This exercise transitions from the centripetal circuit to a real track. Load up the spec racer Ford at Road Atlanta (or your car of choice at a track of your choice, preferably the same car you used in the previous exercises).
Important: Force feedback is still set to zero for this exercise.
Step 1: Retest Straight Line Braking (First 5 Minutes)
We are going to retest our straight line braking limit now that we're on a different surface. Remember, the limit changes depending on conditions. It's going to take a different braking pressure to get to the sound you're targeting, but since we're only braking to achieve and hold a specific sound, we never really have to think about brake pressure.
Instructions:
Find a nice long straight at Road Atlanta (the front straight is recommended)
Go for your out lap and set a reset point at the start of the front straight
Break in a straight line only—don't worry about taking any corners
No downshifting
Repeat exercise one: start at 100% braking, dial down until you find right under a lock-up
Connect that to the tire sound you know you should be achieving
Step 2: Test Straight Line Braking Into Corners (Second 5 Minutes)
There are two corners on Road Atlanta where this will be easiest:
Turn 1
Turn 10 (the downhill hairpin on the back half of the track)
Instructions:
Pick either Turn 1 or Turn 10
Set a reset point before the corner
Use the same reference as before, but with your new knowledge of tire sound
Determine if you gain any deceleration
Assess whether you're able to maintain the limit throughout the corner at a higher level with what you've learned
Remember: Force feedback is still set to zero for this entire 10-minute exercise.
Common Observations
You may notice small dips in tire sound during certain parts of the corner. This is normal and can be corrected on subsequent attempts. One common observation is experiencing changes in grip due to track characteristics.
For example, going into the downhill hairpin at Road Atlanta, the track transitions from downhill to flat or even slightly uphill. This difference in elevation causes a compression to happen, forcing the tires even further into the ground. This compression technically raises the limit at that point.
While we can think about compressions and crests around the whole track, it can get overwhelming and sometimes it's hard to actually see these elevation changes. This is why it's really important to base the limit just off of the sound—because it always adapts to these different characteristics of the track automatically.
Important Note About Apex Cutting
If you keep the tire sound going for the whole corner and you're able to cut the apex, that's a really good sign that you should brake later. Many people fall into the trap of getting closer to the limit but not adjusting their reference, so they subconsciously fall under the limit in order to not cut the apex.
Try purposely to cut the apex—stay so close to the limit that you literally start cutting the apex. If that ever happens, you've found more efficiency out of the tires. This means you're getting so much more rotation and deceleration compared to before, and you need to adjust your braking point later to take full advantage of this increased performance.
Exercise Four: Reintroducing Force Feedback (10 minutes)
Now that we've calibrated ourselves to drive based on auditory and visual cues only, we're going to start introducing force feedback back into our driving.
Setup
Go back to your typical force feedback numbers (for most people, this means hitting the auto button in the black box)
Continue practicing on either Turn 1 or Turn 10 (whichever you practiced on last time)
Focus on one corner for the entire exercise
Only if you're feeling really advanced by the end of the 10 minutes should you attempt full laps
What to Expect
When you turn force feedback back on, it may feel way too heavy at first. It will take a moment to get adjusted to having force feedback again after working without it. This is another reason why we want to focus on just one corner during this exercise—it provides a more controlled environment with fewer variables, making it easier to get comfortable with your brake pedal and to replicate similar pressures consistently.
The Goal
This exercise allows you to see how your ability to identify and maintain the limit has changed. You should now have a much better sense of tire sound and how it relates to the limit, and you can use force feedback as an additional cue rather than the primary cue. The combination of tire sound, visual cues, and force feedback will give you the most complete picture of where you are in relation to the limit.
Tire Sound in Real-World Racing
An important question often arises: How does tire sound relate to a real car?
Tire sounds themselves almost never work in real life the way they do in the simulator. However—and this is a big however—we are going through the exact same process, just using a different delivery method.
In real life, even though we don't have the amplified tire sounds we experience in simulators, we directly replace that cue with g-force. We use the same process to find and maintain the limit throughout straight line braking phases and all other phases of cornering.
Basically, iRacing has implemented tire sound in a very detailed manner to account for the lack of g-force in the simulator—or rather, the lack of sustained g-force, even if you have a motion rig. The tire sound acts as a substitute sensory input that provides the same information that g-force would provide in a real car.
Key Takeaways and Next Steps
Through these exercises, you should have discovered that:
Driving without force feedback teaches you to stop death-gripping the wheel and just relax (an example of the light hands technique)
Using tire sound as a primary cue is more consistent and universal across different cars and conditions
Being closer to the limit than before means you may need to readjust your references to take full advantage of using the tires more efficiently
Tire sound becomes like a crescendo—a faster-paced sound as you approach the limit
While force feedback is important and helps us feel where the limit is, tire sound is the most prominent cue for identifying the limit
When Limit Sound Doesn't Equal Faster Lap Times
It's important to note that being at the limit sound on most corners doesn't always mean it's faster in terms of lap time. If you're closer to the limit than you were before, it's going to take some readjusting in terms of references to take advantage of using the tires more effectively.
This is where corner structure becomes important. If you're really comfortable with the limit concepts covered in this workshop, the next step is to learn how to structure corners to take full advantage of your improved limit-finding abilities.
For Beginners
If you're still struggling with consistency or finding it difficult on certain equipment (such as a G920 without a load cell pedal), it's recommended to go back to the centripetal circuit. This more controlled environment has fewer variables, making it easier to get a better feel for your brake pedal and to become more comfortable replicating similar pressures.
Building on This Foundation
The techniques covered in this workshop serve as foundational skills that will be built upon in future workshops throughout the season. The goal is to allow new Academy members to catch up to veterans while still giving veterans new material to work on, finding the right balance for continued improvement across all skill levels.
This workshop introduces a foundational approach to car control that will help both newcomers and veterans refine their ability to find the limit in a very particular way with specific cues. The techniques covered here will serve as the foundation for future workshops throughout the season.
Learning Objectives
For newcomers to the Academy (two months or less):
Understand that the limit is not a scary term
Learn how to find the limit in two out of the four sections of a corner
Apply these learnings to the real track after practicing on the centripetal circuit
For Academy veterans:
Review foundational concepts
Increase the depth of your limit cues
The first two exercises will take place on the centripetal circuit. League participants should use the spec racer Ford (SRF), while non-league participants are free to run any car on the centripetal circuit.
Understanding the Limit
The word "the limit" will be referenced frequently throughout this workshop. It's important to clarify what this term does and does not mean.
What the Limit Is NOT
The limit does not mean spinning, crashing, locking up, or going off track. When drivers spin and hit the wall, they often say they "found the limit," but this is actually a prime example of exceeding the limit—going over the available grip of the tires.
Defining the Limit
The basic definition of the limit is the maximum load the tires can withstand. There are three states in relation to the limit:
Over the limit: Exceeding the available grip of the tires
Under the limit: Not using the tires to their maximum capability
At the limit: The sweet spot in the middle where we maximize tire grip
We always want to be driving at the limit—this is always the goal in racing. We should be maximizing the grip that the tires are providing. Once we acquire the ability to drive the tires to the limit, we want to structure our corner with the goal of staying at the limit from entry to exit.
Limit Cues and Why We Need Them
We never want to brake with the goal of achieving a specific amount of braking pressure. This approach has several problems:
It doesn't account for track characteristics
It doesn't account for different conditions (weather, temperature, etc.)
Trying to mimic peak pressure from track guides or other drivers' telemetry doesn't account for compressions, crests, or temperature variations
It will sometimes put you over the limit and sometimes drastically under the limit
The main reason we want limit cues is because they are real-time indicators of grip levels. Limit cues automatically morph into what the limit is at that exact moment, which is why they're easier to replicate consistently.
Categories of Limit Cues
There are three different categories of limit cues:
Category 1: Audible sounds
Sounds from the car and tires
Particularly the sound being produced by the tires as you approach the limit
Category 2: Visual cues
In non-ABS cars (spec racer Ford, formula cars, some GT cars): physically seeing the wheel stop, seeing smoke, seeing lock-up lights (old Porsche Cup, some old GTE cars, LMP2)
In ABS cars (GT3, GT4): ABS lights that engage when the system activates (approximately 80% have these)
Horizon movement and what we're seeing visually
The speed at which we're approaching the corner—our rate of slowing as we track the apex while decelerating
Category 3: Tactile or general feel
Force feedback through the wheel
Base shakers (if equipped)
Pedal haptics (such as SimuCube active pedals or SimMagic pedal shakers, when set up correctly)
The Most Important Limit Cue: Tire Sound
Tire sound is considered the most important limit cue for several reasons:
Universal application: No matter what car we're in, we always get tire sound, even though it's not the same from car to car
Easy recalibration: We can easily retest and figure out what tire sound we're looking for
Real-time adjustment: It automatically adjusts to the grip level at that exact moment
Works in all four sections of a corner: Tire sound can be used under straight line braking, initial turn-in, mid-corner, and exit
In contrast, force feedback works best mid-corner and on corner exit, but is less useful for straight line braking and initial turn-in.
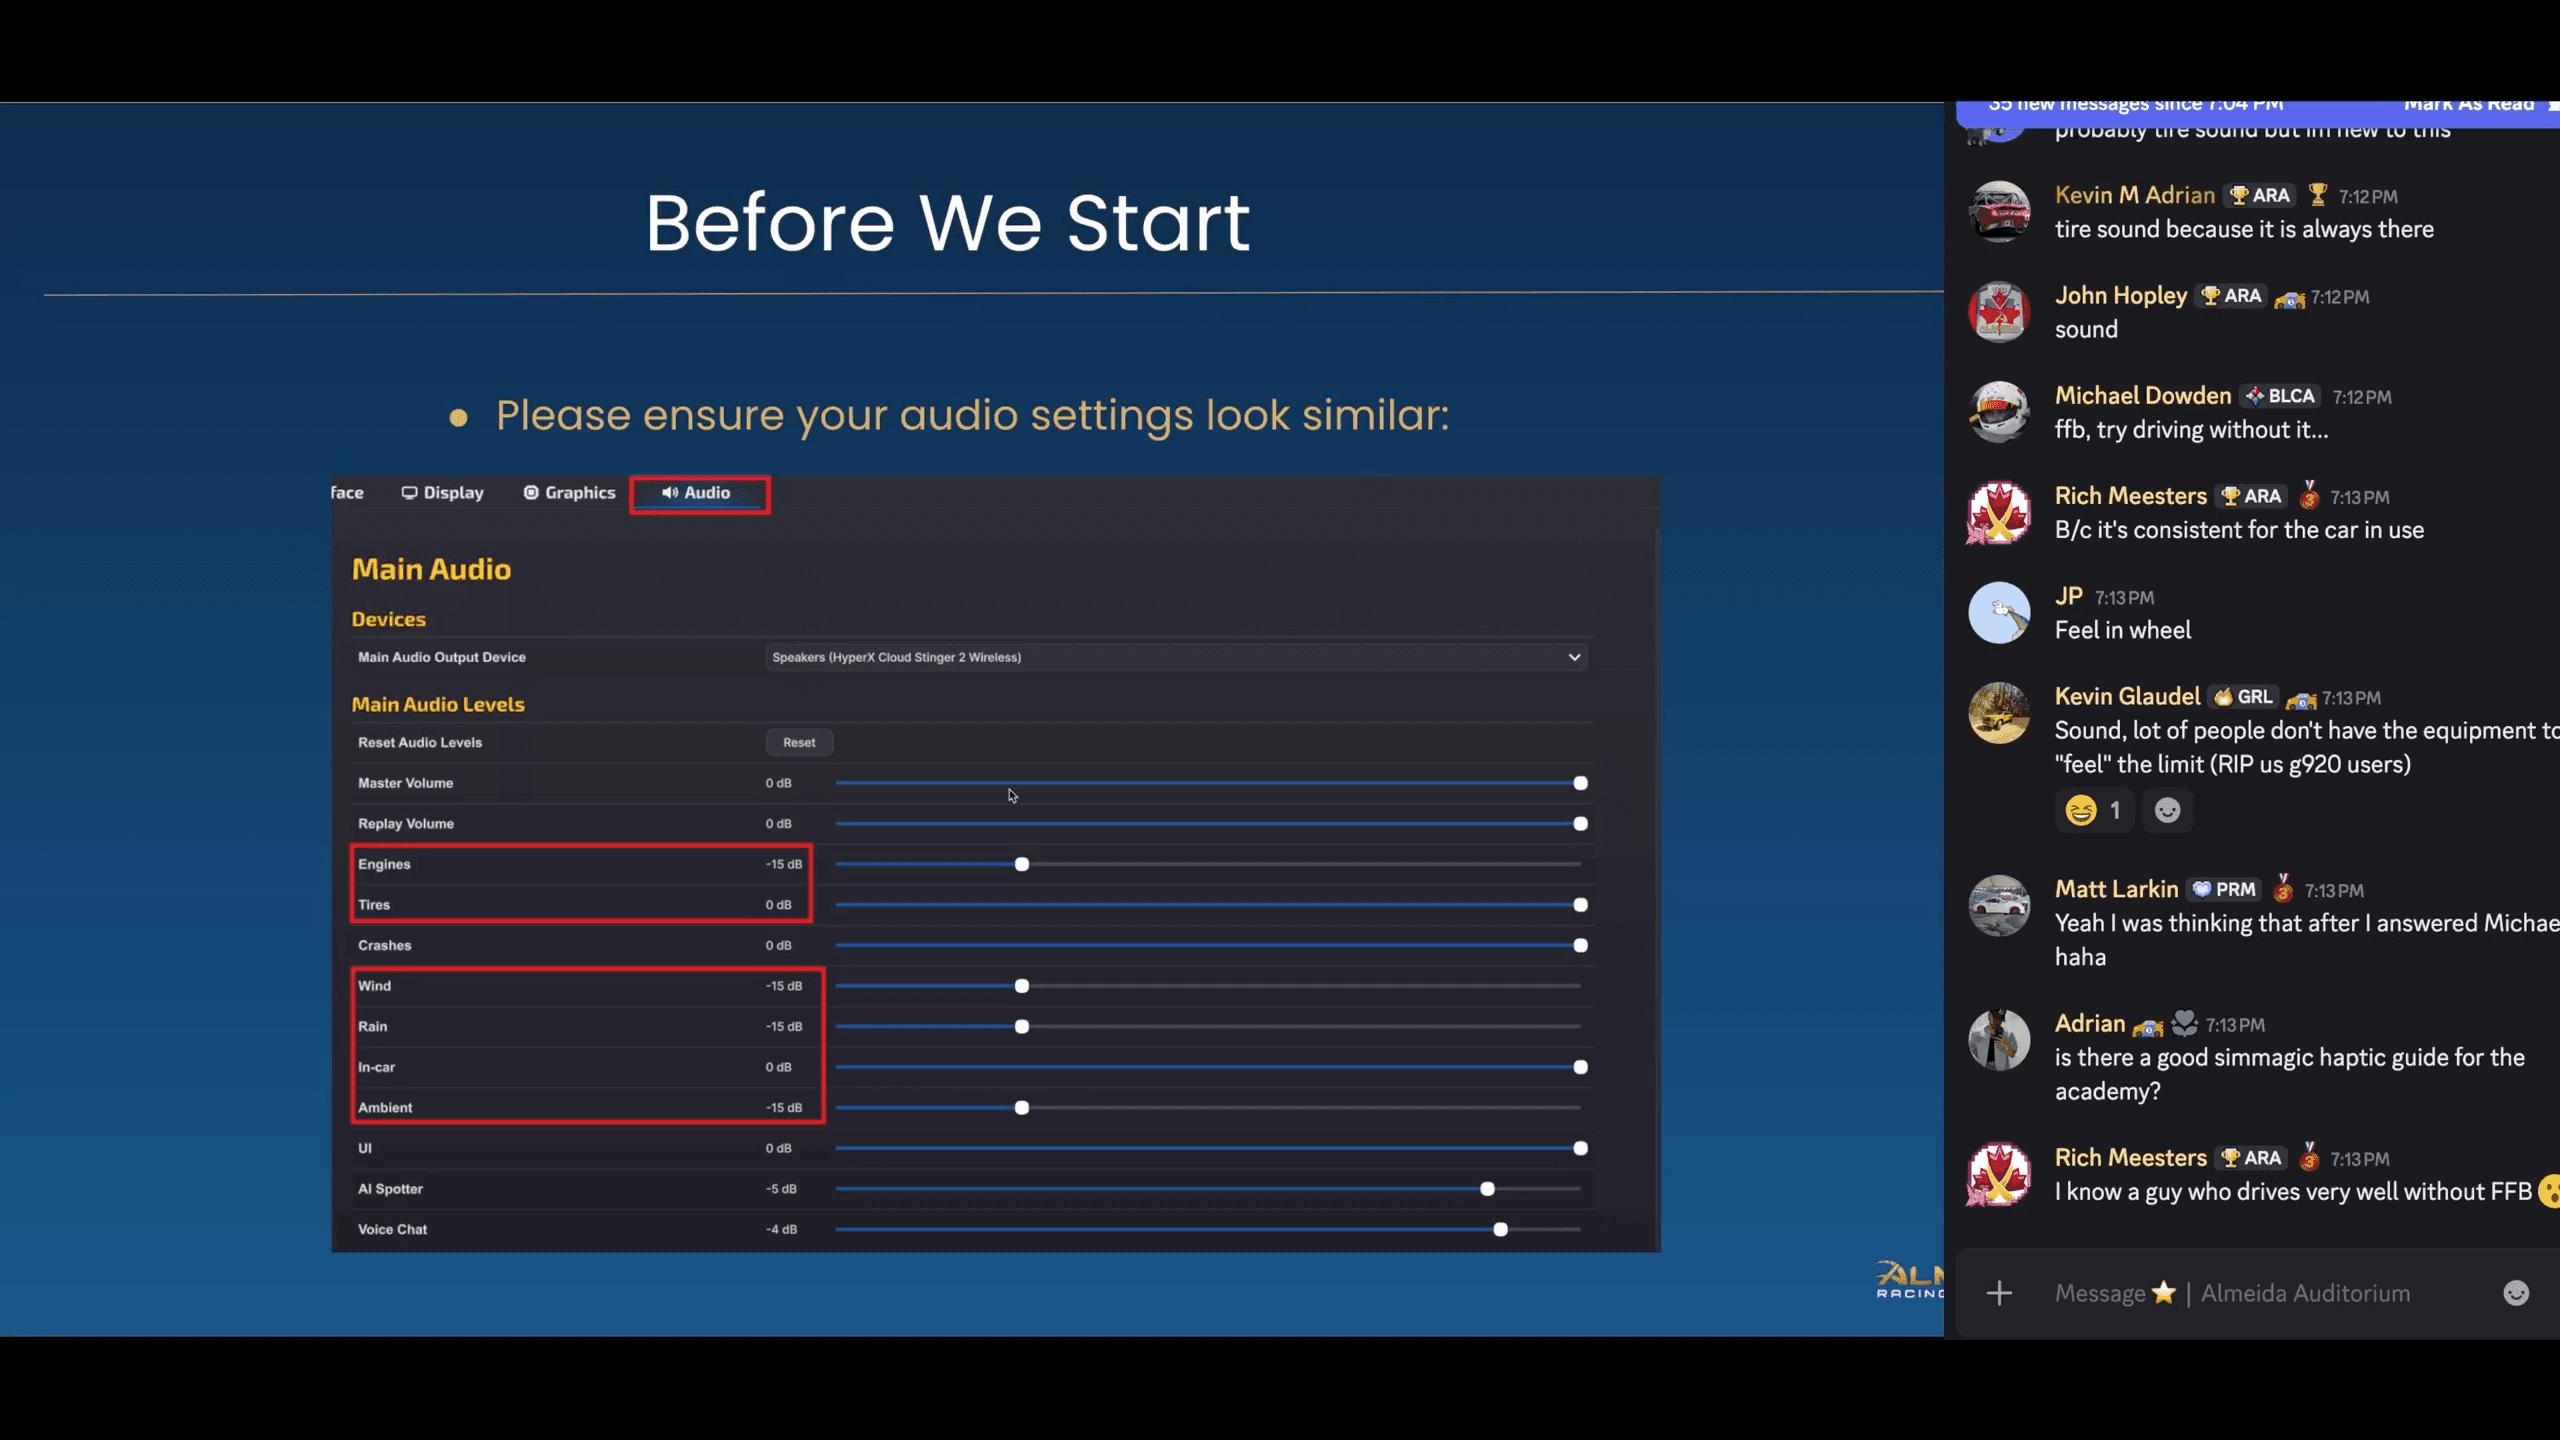
Audio Settings Configuration
For newcomers to the Academy, it's crucial to configure your iRacing audio settings properly. Navigate to your iRacing settings, go to the audio tab, and ensure your settings look similar to these recommendations:
Tires: Maxed out
In-car: Maxed out
Engine slider: Pulled down to amplify tire noise even more
The bare minimum for the engine slider should be -12 decibels. A recommended range is around -15 decibels. Some experienced drivers run theirs at the lowest setting, which is -20 decibels. You can experiment within this range to find your sweet spot. If your engine becomes too quiet after these adjustments, feel free to crank up your master volume—this will also help you hear the tires even better.
Step One: Finding the Limit Under Straight Line Braking
Finding the limit in any given situation can be a difficult task initially. We're going to make this as easy as possible by starting with the safest and most controlled scenario.
Why Start With Straight Line Braking?
Testing tire grip under straight line braking offers several advantages:
Safety: It's the safest point in the corner to get to the limit. The worst thing that happens is a slight lock-up, causing you to go slightly under the limit. In contrast, trying mid-corner techniques without the necessary skills can result in spins or understeer, leading to frustration.
Easy identification: It's the easiest point in the corner to identify when you've gone over the limit—you simply lock up. This is very easy to hear and see.
Controlled environment: It allows us to get comfortable with our cues in a controlled environment with no variables like steering wheel input or excessive downshifting. We can focus entirely on what we're targeting.
Important: Turning Off Force Feedback
For the first few exercises in this workshop, we are going to turn off force feedback. The reason for this approach is that we want you to get a good feel for the other available limit cues, with the most important one being tire sound. We're also going to practice visual cues.
For Academy veterans who feel they already have a good feel for tire sound, this exercise will push you even further because you won't have that extra sense of force feedback to rely on.
To turn off force feedback, access the black box in iRacing (F8 or F9) and pull the slider down to zero.
Exercise One: Straight Line Braking on Centripetal Circuit (10 minutes)
This exercise takes place on the centripetal circuit with the SRF (for league participants) or your car of choice (for non-league participants).
Exercise Instructions
Begin against the outer wall and pick up speed headed towards the middle of the circle
Keep the wheel straight (this is highlighted for emphasis—especially important since we have no force feedback)
Begin by braking at 100% (you will lock up on purpose—in order to find the limit, we must first go over it)
Dial down braking pressure after each attempt in small increments: 95%, 90%, 85%, 80%, etc., until you get right below a lock-up (these increments don't have to be perfect; just go down by small amounts)
Once you reach the point right below a lock-up, connect that braking pressure to a very specific pitch that the tires are producing
Replicate this target tire sound five attempts in a row, starting at the outside wall and going to the middle with speed, braking to the limit each time
To confirm you are exactly at the limit after five successful attempts, increase your brake pressure by a couple percent—you should theoretically go over the limit with just that small increase
If you don't easily go over the limit with that couple percent extra, go back through all five steps again
Recommendations
For new Academy members, it's highly recommended to do this without any downshifting. Upshift to pick up speed, but leave it in that gear as you're testing the limit under straight line braking.
For Academy veterans, you can go straight into downshifting, but it's still recommended to start without downshifting and then work your way into it.
Step Two: Testing Grip from Maximum Rotation Point to Corner Exit
Now that we have straight line braking established, we're going to move on to the next easiest portion of the corner to test grip: from the maximum rotation point (MRP) through to corner exit.
On the centripetal circuit, we don't actually have a traditional maximum rotation point—we're mimicking that scenario in a controlled environment. On a real track, this section would be anything beyond the apex.
Limit Cues for This Exercise
For this exercise, we will be using tire sounds and visual cues to identify and drive the limit of the tires. Force feedback should still be set to zero.
Exercise Two: MRP to Exit on Centripetal Circuit (8 minutes)
Exercise Instructions
Keep force feedback set to zero (as it should have been from step one)
Pick one of the circles on the centripetal circuit (they are marked—there's a 50, 60, 70, 80, etc. circle with markers at the start/finish line before each one)
Any circle should work fine for this exercise
Find the circle and bring the tires up to the limit while maintaining that limit based on tire sound and visual cues alone
Identifying Over the Limit
When you go over the limit in this exercise:
The tire sound will become too high of a pitch (high-pitched squealing)
You will begin to understeer
Visually, the horizon in front of you will slow in the way it's accelerating across your screen
If you try to add more steering input to find more grip from the front tires, it won't work
Identifying Under the Limit
When you are under the limit:
You won't be getting enough tire sound based on experience
The horizon will not be rotating as fast as it could if you were at the limit
Finding the Target
Use what you learned from the straight line braking exercise to give you an idea of the rough tire sound you're looking for. The tire sound should be fairly similar from straight line braking to this exercise. Once you identify over the limit, dial down to the limit and connect that to the tire sound. The goal is to increase speed until you reach the precise tire sound that indicates you're at the limit, then maintain that sound consistently.
What we're working on here is figuring out and getting a better understanding of what tire sound we're looking for. It's very easy as a driver to target a general range of tire sound, which is a good starting point. But in this workshop, we're looking to be a little bit more specific—we want to dial in exactly what pitch we're looking for.
Exercise Three: Applying Learning to the Real Track - Part 1 (10 minutes)
This exercise transitions from the centripetal circuit to a real track. Load up the spec racer Ford at Road Atlanta (or your car of choice at a track of your choice, preferably the same car you used in the previous exercises).
Important: Force feedback is still set to zero for this exercise.
Step 1: Retest Straight Line Braking (First 5 Minutes)
We are going to retest our straight line braking limit now that we're on a different surface. Remember, the limit changes depending on conditions. It's going to take a different braking pressure to get to the sound you're targeting, but since we're only braking to achieve and hold a specific sound, we never really have to think about brake pressure.
Instructions:
Find a nice long straight at Road Atlanta (the front straight is recommended)
Go for your out lap and set a reset point at the start of the front straight
Break in a straight line only—don't worry about taking any corners
No downshifting
Repeat exercise one: start at 100% braking, dial down until you find right under a lock-up
Connect that to the tire sound you know you should be achieving
Step 2: Test Straight Line Braking Into Corners (Second 5 Minutes)
There are two corners on Road Atlanta where this will be easiest:
Turn 1
Turn 10 (the downhill hairpin on the back half of the track)
Instructions:
Pick either Turn 1 or Turn 10
Set a reset point before the corner
Use the same reference as before, but with your new knowledge of tire sound
Determine if you gain any deceleration
Assess whether you're able to maintain the limit throughout the corner at a higher level with what you've learned
Remember: Force feedback is still set to zero for this entire 10-minute exercise.
Common Observations
You may notice small dips in tire sound during certain parts of the corner. This is normal and can be corrected on subsequent attempts. One common observation is experiencing changes in grip due to track characteristics.
For example, going into the downhill hairpin at Road Atlanta, the track transitions from downhill to flat or even slightly uphill. This difference in elevation causes a compression to happen, forcing the tires even further into the ground. This compression technically raises the limit at that point.
While we can think about compressions and crests around the whole track, it can get overwhelming and sometimes it's hard to actually see these elevation changes. This is why it's really important to base the limit just off of the sound—because it always adapts to these different characteristics of the track automatically.
Important Note About Apex Cutting
If you keep the tire sound going for the whole corner and you're able to cut the apex, that's a really good sign that you should brake later. Many people fall into the trap of getting closer to the limit but not adjusting their reference, so they subconsciously fall under the limit in order to not cut the apex.
Try purposely to cut the apex—stay so close to the limit that you literally start cutting the apex. If that ever happens, you've found more efficiency out of the tires. This means you're getting so much more rotation and deceleration compared to before, and you need to adjust your braking point later to take full advantage of this increased performance.
Exercise Four: Reintroducing Force Feedback (10 minutes)
Now that we've calibrated ourselves to drive based on auditory and visual cues only, we're going to start introducing force feedback back into our driving.
Setup
Go back to your typical force feedback numbers (for most people, this means hitting the auto button in the black box)
Continue practicing on either Turn 1 or Turn 10 (whichever you practiced on last time)
Focus on one corner for the entire exercise
Only if you're feeling really advanced by the end of the 10 minutes should you attempt full laps
What to Expect
When you turn force feedback back on, it may feel way too heavy at first. It will take a moment to get adjusted to having force feedback again after working without it. This is another reason why we want to focus on just one corner during this exercise—it provides a more controlled environment with fewer variables, making it easier to get comfortable with your brake pedal and to replicate similar pressures consistently.
The Goal
This exercise allows you to see how your ability to identify and maintain the limit has changed. You should now have a much better sense of tire sound and how it relates to the limit, and you can use force feedback as an additional cue rather than the primary cue. The combination of tire sound, visual cues, and force feedback will give you the most complete picture of where you are in relation to the limit.
Tire Sound in Real-World Racing
An important question often arises: How does tire sound relate to a real car?
Tire sounds themselves almost never work in real life the way they do in the simulator. However—and this is a big however—we are going through the exact same process, just using a different delivery method.
In real life, even though we don't have the amplified tire sounds we experience in simulators, we directly replace that cue with g-force. We use the same process to find and maintain the limit throughout straight line braking phases and all other phases of cornering.
Basically, iRacing has implemented tire sound in a very detailed manner to account for the lack of g-force in the simulator—or rather, the lack of sustained g-force, even if you have a motion rig. The tire sound acts as a substitute sensory input that provides the same information that g-force would provide in a real car.
Key Takeaways and Next Steps
Through these exercises, you should have discovered that:
Driving without force feedback teaches you to stop death-gripping the wheel and just relax (an example of the light hands technique)
Using tire sound as a primary cue is more consistent and universal across different cars and conditions
Being closer to the limit than before means you may need to readjust your references to take full advantage of using the tires more efficiently
Tire sound becomes like a crescendo—a faster-paced sound as you approach the limit
While force feedback is important and helps us feel where the limit is, tire sound is the most prominent cue for identifying the limit
When Limit Sound Doesn't Equal Faster Lap Times
It's important to note that being at the limit sound on most corners doesn't always mean it's faster in terms of lap time. If you're closer to the limit than you were before, it's going to take some readjusting in terms of references to take advantage of using the tires more effectively.
This is where corner structure becomes important. If you're really comfortable with the limit concepts covered in this workshop, the next step is to learn how to structure corners to take full advantage of your improved limit-finding abilities.
For Beginners
If you're still struggling with consistency or finding it difficult on certain equipment (such as a G920 without a load cell pedal), it's recommended to go back to the centripetal circuit. This more controlled environment has fewer variables, making it easier to get a better feel for your brake pedal and to become more comfortable replicating similar pressures.
Building on This Foundation
The techniques covered in this workshop serve as foundational skills that will be built upon in future workshops throughout the season. The goal is to allow new Academy members to catch up to veterans while still giving veterans new material to work on, finding the right balance for continued improvement across all skill levels.
Connor Bell Workshops
Other Lessons